• Registered users are encouraged to enable MFA/2FA to add an aditional layer of security to their account. More information can be found here: https://www.ncsc.gov.uk/collection/top-tips-for-staying-secure-online/activate-2-step-verification-on-your-email

FN2 Not a happy bunny

Messages
147
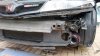
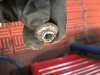
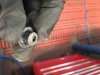
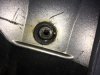
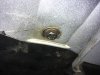
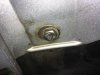
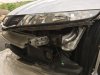
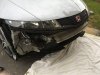
Found out now why the fog lights hadn't been changed before I purchased the car. I thought at first when I started the driver's side that somebody must have had a go before. Got all the wheel archs loose, removed the two screws on the arches holding top sides of the bumper. Proceeded to start under the bumper, hang on where's the 1st bolt, oh that's it somebody has already done an Alan Shearer. Thought o.k, that's not great but repairable in the future. Removed the plastic locking pins, last bolt..just turns, been trying for over a hour to try and get the sucker to bite the thread. No not having any of it. Just couldn't make it up..always the last bolt. So just got to put all the thing back together. Going to have to get the car into work tomorrow morn if I can before I start work to either cut/grind the head off. Then when I have time to drill and tap the remains of bolts out. It looks like 6mm or 8mm and made of monkey metal so shouldn't be that hard. If not I will just drill it bigger and re-tap it or heli-coil it if there's enough depth..always a pain..gutted. Just wanted a nice easy sunday moring just to change two fog lights.
 
Last edited by a moderator:
Had the same problem.
Bought two nice shiny bolts thinking one was missing. Then found it was sheared off and I can't be bothered to sort it yet.
Sound idea to enlarge the hole since I think it screws into solid metal.
 
It looks like a 6mm alan key loction in the cap head. Im hoping that if I go down the middle with a 3mm pilot hole I can then go down with a 6mm, 6.5 drill and hopefully the head will drop off ..in a ideal world. The bolt has a plain 10mm shaft after the head so looks like I will have to drill 10-12mm depth to hit the begining of the 6mm screw thread. Will let you know how I get on...
 
These cars are getting to that sort of age unfortunately. You should have seen what I had to do with my DC5. The front lip was a mess!! I had to fork out around £80 on oem clips, screws, brackets, plus the cost of the second hand lip.
Bear with it, it’s worth it in the end. You’ll have piece of mind it’s all done tidy.
By the time I let the DC5 go after 4 years I knew every inch of it practically. Wasn’t much I hadn’t had apart for one reason or another and by the time it went to the new owner it was considerably tidier than when I had it
 
Yeah I know, just a little annoying. I will get some carbide drill bits. The bolts be out in seconds, its cheap material. Its just time consumming, getting car in to work etc. Any body know the length of the bolts. Just helps with the drilling depth. Carnt see them being more than 20mm
 
Look in the magnetic tray, there's one of the bolts in the middle. I'd guess the thread is the same as the whole length of the screw at the bumper top.
 

Attachments

  • DSC_0053_copy_2393x1350.jpg
    DSC_0053_copy_2393x1350.jpg
    678.9 KB · Views: 18
Look in the magnetic tray, there's one of the bolts in the middle. I'd guess the thread is the same as the whole length of the screw at the bumper top.

So if thats the case their 6mm long. The thread is 6mm or are the cars imperial, cant see it being 1/4 unc. The thread dosent look coarse enough. Im going with 6mm, thats fine. I will drill and tap 6mm thread and 9mm depth.
 
I removed my bumper the other day to install a cold air intake for my HKS, one of the lower bolts snapped clean off, the other came out fine. Joys of a 13 year old car and bolts that have never been touched.
 
More 20mm at a guess. Been a few years since I took the bumper off, think I got the wrong screw.
 
More 20mm at a guess. Been a few years since I took the bumper off, think I got the wrong screw.

No problems, dont think it needs too much depth, 10-15mm will surfice. Its only holding bottom of the plastic bumper. If I get into work early tomorrow morn, I will drill them out.
 
Completed

Well, went straight forward really. Drilled 3mm pilot, Finish 5mm Tapping drill, tapped 6mm, used Stainless steel 6mm Setscrews with washers-O/D16mm(for now). Used Carbide drills, like through butter it was. Just need to get hold of some self coloured Setscrews really. Not ideal using Stainless on to carbon steel, you get a faster corrosion to the carbon steel (Well I'm thinking the plate I have drill into is coated carbon steel)
The plate I drill and tapped is around 4-6mm thick. I just need to also get some 6mm over sized washers, as you can see the original is one piece and the washer landing is around 18mm O/D
Any way it is done, got time to get the washer/Setscrews bits . The main thing is I can now do my fog lights....:D
 

Attachments

  • IMG_1166 (Medium).JPG
    IMG_1166 (Medium).JPG
    108.4 KB · Views: 23
  • IMG_1167 (Medium).JPG
    IMG_1167 (Medium).JPG
    108 KB · Views: 21
  • IMG_1170 (Medium).JPG
    IMG_1170 (Medium).JPG
    224.2 KB · Views: 21
  • IMG_1171 (Medium).JPG
    IMG_1171 (Medium).JPG
    218.7 KB · Views: 19
  • IMG_1172 (Medium).JPG
    IMG_1172 (Medium).JPG
    188.5 KB · Views: 20
Last edited by a moderator:
I love POR15 personally as it’s marine grade meaning it’s got to stand up to sea water levels of corrosion but there are other products out there. Anywhere invisible to the eye that’s bare metal you could coat liberally to prevent corrosion. It can go over rust and painted surfaces too but would give you piece of mind those areas are not going to get rust anytime soon
 
I love POR15 personally as it’s marine grade meaning it’s got to stand up to sea water levels of corrosion but there are other products out there. Anywhere invisible to the eye that’s bare metal you could coat liberally to prevent corrosion. It can go over rust and painted surfaces too but would give you piece of mind those areas are not going to get rust anytime soon

I will look that up sounds just the thing I'm looking for, mind you I will look at work first. We paint valves in a paint spec that's for offshore. If not, that sounds just right, shame they don't do it in the silver. When I remove the bumper I will paint the surrounding areas. What is the cost and where can you purchase it.
 
This kit is great for smaller jobs but only includes black unfortunately: https://www.carbuilder.com/uk/por-1...MI1b7qov_26AIVibPtCh0zSQQSEAQYASABEgJ3J_D_BwE

For larger areas they do a nice silver. I did the floor pan on my DC5 and it looked great!

http://i1257.photobucket.com/albums/ii502/davidpingu/20130209_152036_zps3824979b.jpg

Possibly looking at doing the whole of the underneath joints, I mean the long joints were you jack the car up that runs the length of the car. I think the silver will be perfect for that job. Then the black for underneath the bumper will suffice I think.:smt023
 
Por15 dries very hard and doesn’t flake like a normal paint. I’m thinking about doing the jacking points on the FK8 just because the moment you use them the oem paint (red in my case) is lost. May have to do mine with the black I have left over but they’re hidden anyway so I see no issue what colour you use if it’s not on show!

For the underside floor pan I do think that a lighter colour gives you a better indication of any issues over the years as you’d see darker/orange patches easier than on the black I should think but I’m talking years down the line as POR15 should keep things tip top for a looooong time
 
When I remove the screws at the arch and capscrews underneath an the clips. How does it come away from the front grill and lights.
 
If you are talking about the bumper it just pulls away.
once ALL the screws & clips holding it are out then all that supports it are two brackets that it just slots into.

If you have the headlight washers you will have to remove them from the bumper or take the pipe off the reservoir - get a bowl under it 'cos there is nothing to stop the water coming out.
 
Yessss, new fog lights

Well didn't take me that long to remove the bumper. I cleaned the bumper off, 12 years of dirt and the metal bracket the bumper attaches too. That needs treating in the summer, couple of rust spots but nothing drastic. Removed the lights, replaced, hey presto, working fog lights. It got rid of the blown rusty looking things and now it looks clean.:D
 

Attachments

  • IMG_1229 (Medium).JPG
    IMG_1229 (Medium).JPG
    150.6 KB · Views: 10
  • IMG_1230 (Medium).JPG
    IMG_1230 (Medium).JPG
    149.6 KB · Views: 10
  • IMG_1232 (Medium).JPG
    IMG_1232 (Medium).JPG
    158.3 KB · Views: 11
  • IMG_1233 (Medium).JPG
    IMG_1233 (Medium).JPG
    154.7 KB · Views: 11
  • IMG_1236 (Medium).JPG
    IMG_1236 (Medium).JPG
    225.5 KB · Views: 10
Back
Top