
You are using an out of date browser. It may not display this or other websites correctly.
You should upgrade or use an alternative browser.
You should upgrade or use an alternative browser.
Removal Of Front Wing
- Thread starter ShaunCTR
- Start date
- Messages
- 42,953
TypeRiter has done it before, photo links are dead though.
http://type-r-owners.co.uk/forums/s...-s-build-chat-thread./page37&highlight=fender
http://type-r-owners.co.uk/forums/s...-s-build-chat-thread./page37&highlight=fender
- Messages
- 25,724
TypeRiter has done it before, photo links are dead though.
http://type-r-owners.co.uk/forums/s...-s-build-chat-thread./page37&highlight=fender
TypeTwicer often removes his photos
 .
.- Messages
- 97
a Haynes manual never goes a miss despite the fact that they don't do one for the Type R, the edition they do for the EP2 covers a vast majority of the jobs that you can do on the EP3 as they are practically the same car when it cones to how they were manufactured. so especially things like body panels will b covered, failing that just look for bolts and undo them until it comes off heh im not sure of how many exactly there are but I believe it's - 4 along the top, underneath bonnet. 1 is behind the bumper so that will need to come off + a further 2 behind wheel arch liner ay rear of wheel arch if I were you I would whip the wheel off too as it's a 5 min job and gives you alot more room to work. hope this helps
despite the fact that they don't do one for the Type R, the edition they do for the EP2 covers a vast majority of the jobs that you can do on the EP3 as they are practically the same car when it cones to how they were manufactured. so especially things like body panels will b covered, failing that just look for bolts and undo them until it comes off heh im not sure of how many exactly there are but I believe it's - 4 along the top, underneath bonnet. 1 is behind the bumper so that will need to come off + a further 2 behind wheel arch liner ay rear of wheel arch if I were you I would whip the wheel off too as it's a 5 min job and gives you alot more room to work. hope this helpsIt's a lot to accurately explain in a post. So i'll let you know what the vital points are. If you're mechanically minded it shouldn't be too difficult to then deduce what bolts need removing around that area.
- Remove Wheel, Bumper, and arch liner.
Points to remember (in no particular order).
1) There is a 10mm bolt underneath the triangle casing in the wing mirror area (not the actual wing mirror) it's the casing that doesn't open out with the door and fits in the corner section of the wing.
2) There is a 10mm bolt underneath the car next to the jack-point cover by a load of adhesive gunk - this will need removing. The Side-skirt will need to be removed or part removed/loosed to free the arch from this area, once said bolt has been removed.
3) With the bumper removed there will be a white bracket which will need to be transferred over to the new wing. Remove and retatin this.
4) All the bolts that require removing will look the same - IIRC, there is about 6-8 of them, and should be in the colour of the car. Mine were all NHB.
5) There is some window trim that runs up the side of the windscreen, this will need removing to get at another one of the bolts mentioned in point 4.
6) Unless you are removing the door (I didn't) there are some clips in the door area, where the hinge is, that will most certainly snap unless you remove them from the inside - this can be done via removing the arch liner and attacking them throught the wheel arch. Just pop these out as these will need to be popped back into the new arch via the door area again - this is fiddily. These pop clips are delicate.
7) Carefully open and close the door first time the arch has been fitted as you don't want them to foul each other and dent/damage one or the other due to mis-alignment. I have fitted aftermarket which had alignment issues. OEM arches went on a doddle, when I fitted them for someone else.
I'll see if I can find some pictures of the wings that I had removed, and the replacement wings that I had bought - as these will have bolt holes on them, which'll help to give you an idea of where you need to be looking to remove bolts from.
Here's one I found of the wing removed - that'll give some idea, until I can find other pics.
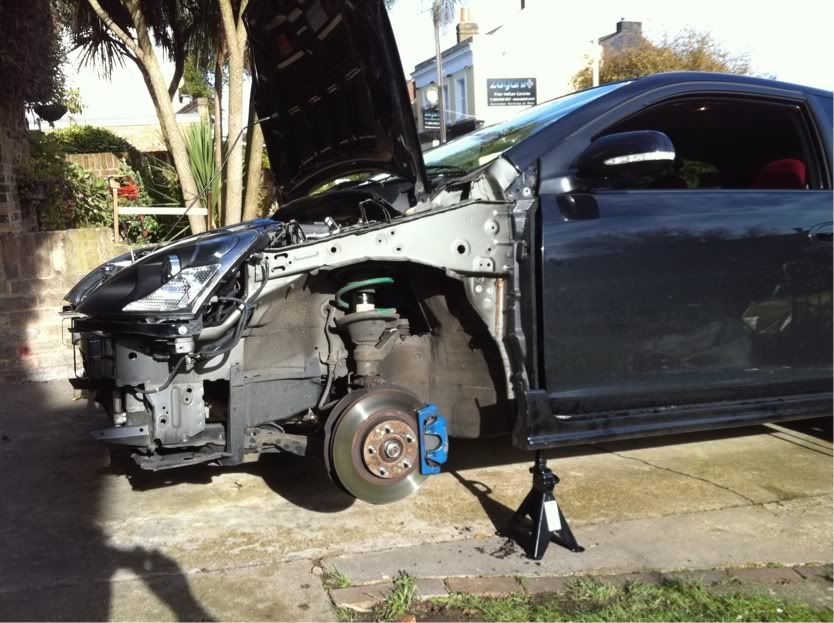
If you need any help give me a shout. It's best to work in sections - by this I mean undo everything in the area that you are working on - it's a lot more organised, and easier to keep a trace of what goes where. Once you've done one side, doing the other is a doddle.
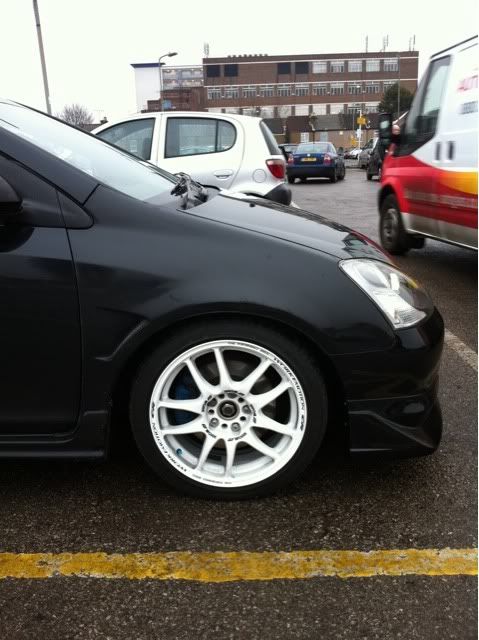
One with new wing fitted
- Remove Wheel, Bumper, and arch liner.
Points to remember (in no particular order).
1) There is a 10mm bolt underneath the triangle casing in the wing mirror area (not the actual wing mirror) it's the casing that doesn't open out with the door and fits in the corner section of the wing.
2) There is a 10mm bolt underneath the car next to the jack-point cover by a load of adhesive gunk - this will need removing. The Side-skirt will need to be removed or part removed/loosed to free the arch from this area, once said bolt has been removed.
3) With the bumper removed there will be a white bracket which will need to be transferred over to the new wing. Remove and retatin this.
4) All the bolts that require removing will look the same - IIRC, there is about 6-8 of them, and should be in the colour of the car. Mine were all NHB.
5) There is some window trim that runs up the side of the windscreen, this will need removing to get at another one of the bolts mentioned in point 4.
6) Unless you are removing the door (I didn't) there are some clips in the door area, where the hinge is, that will most certainly snap unless you remove them from the inside - this can be done via removing the arch liner and attacking them throught the wheel arch. Just pop these out as these will need to be popped back into the new arch via the door area again - this is fiddily. These pop clips are delicate.
7) Carefully open and close the door first time the arch has been fitted as you don't want them to foul each other and dent/damage one or the other due to mis-alignment. I have fitted aftermarket which had alignment issues. OEM arches went on a doddle, when I fitted them for someone else.
I'll see if I can find some pictures of the wings that I had removed, and the replacement wings that I had bought - as these will have bolt holes on them, which'll help to give you an idea of where you need to be looking to remove bolts from.
Here's one I found of the wing removed - that'll give some idea, until I can find other pics.
If you need any help give me a shout. It's best to work in sections - by this I mean undo everything in the area that you are working on - it's a lot more organised, and easier to keep a trace of what goes where. Once you've done one side, doing the other is a doddle.
One with new wing fitted
Last edited by a moderator:
- Messages
- 270
It's a lot to accurately explain in a post. So i'll let you know what the vital points are. If you're mechanically minded it shouldn't be too difficult to then deduce what bolts need removing around that area.
- Remove Wheel, Bumper, and arch liner.
Points to remember (in no particular order).
1) There is a 10mm bolt underneath the triangle casing in the wing mirror area (not the actual wing mirror) it's the casing that doesn't open out with the door and fits in the corner section of the wing.
2) There is a 10mm bolt underneath the car next to the jack-point cover by a load of adhesive gunk - this will need removing. The Side-skirt will need to be removed or part removed/loosed to free the arch from this area, once said bolt has been removed.
3) With the bumper removed there will be a white bracket which will need to be transferred over to the new wing. Remove and retatin this.
4) All the bolts that require removing will look the same - IIRC, there is about 6-8 of them, and should be in the colour of the car. Mine were all NHB.
5) There is some window trim that runs up the side of the windscreen, this will need removing to get at another one of the bolts mentioned in point 4.
6) Unless you are removing the door (I didn't) there are some clips in the door area, where the hinge is, that will most certainly snap unless you remove them from the inside - this can be done via removing the arch liner and attacking them throught the wheel arch. Just pop these out as these will need to be popped back into the new arch via the door area again - this is fiddily. These pop clips are delicate.
7) Carefully open and close the door first time the arch has been fitted as you don't want them to foul each other and dent/damage one or the other due to mis-alignment. I have fitted aftermarket which had alignment issues. OEM arches went on a doddle, when I fitted them for someone else.
I'll see if I can find some pictures of the wings that I had removed, and the replacement wings that I had bought - as these will have bolt holes on them, which'll help to give you an idea of where you need to be looking to remove bolts from.
Here's one I found of the wing removed - that'll give some idea, until I can find other pics.
If you need any help give me a shout. It's best to work in sections - by this I mean undo everything in the area that you are working on - it's a lot more organised, and easier to keep a trace of what goes where. Once you've done one side, doing the other is a doddle.
One with new wing fitted
Thank you soo much for that Matey however it appears to be alot more challenging than I initially thought!!!!
- Messages
- 7,088
One with new wing fitted
Can't believe you let them break you fella. I thought you were committed to calling them fenders!
- Messages
- 1,142
This thread is ideal for me when i get a another front wing (dont ask) , i might even pop down to you Typeriter as your so local to me
- Messages
- 62
Nice post type writer!