
- Messages
- 50
Ok, first of all, all of this information was researched by me and the selection of parts was researched by me. Feel free to do your own research and select your own parts. There are way better parts, better computers out there, but if you want you can copy everything that I have done and I guarantee that it will work.
This DIY is for the lazy people out there (like me) who wished something out there like this was available instead of having to search through hundreds of threads to make decent sense of building a car computer. Use this as a rough guide. I'll try to include as much of the install as much as I can. I'm also using the stock amps so for all you audio gurus out there, feel free to add amps. here's the breakdown of the parts that I used and rough prices. Remember these are my opinions!
I will be updating this everyday until I finish the write-up. there's a lot of info...
The prices here are what i ended up spending +/- $100.00
Wiring diagram is belooowwwww
Mac Mini - You can probably get a decent Intel core duo/solo one for about $350-$500. Get the Intel chip so you can run both windows and OS X. I also upgraded my RAM to 2gigs instead of 512MB. Add another $100.00
7" monitor - Xenarc 700TSV - touchscreen monitor. 379.00 + 20 shipping
American Interntional bezel from ebay - dont pay more than $20.00 shipping included on ebay search! you gotta look at the bezel. If it's an americal international, youll see a frame around the double din. You can probably use another double din, but the AI looks better with the frame IMHO.
glue sticks, glue gun, epoxy - $20.00 at lowes or Ace Hardware.
Carnetix P1900 (CNX-P1900 Ver. 2.2 Dual Output 140 Watt 12V DC-DC Regulator) (you need this to power up your Mac and to shut it down instead of pressing the button. In other words, you let the car turn on/turn off instead of you having to press the button. more info later)- $99.95 shipped from mp3car.com. Another alternative (possibly better but more expensive) is the P2140 power supply. This power supply allows you visually see what the power supply is "pulling" from the car and "putting out" to your screen and Mac mini.
Carnetix Macpac cable harness (connects your power supply to your car to your car's power supply) This thing is awesome. Allows you to not have to cut you power supply which came with your mac mini. So if you want to remove the computer from your car, you can because you'll still have your original in your house. - $24.99 shipped
Ground loop isolator- (to eliminate engine noise quickly when you think you grounded everything correctly. worked for me!) - $8.00 shipped through ebay. When I thought i had grounded everything correctly, I still had alternator whine and computer hard drvie noises. Now installing this got rid of all that.
Metra wire harness - $21.00 - use it so you don't have to cut into your factory harness to hook up your stock amp and stock speakers. It's also a good idea to have because if you dont use it, soldering in that little double din hole becomes annoying.- Clubrsx.com
RCA cables - 4 bucks shipped through ebay. You should probably get some gold ones though, i used cheapo ones..
zip ties - $10.00 at walmart.
Edirol/Roland UA-1EX sound card interface box (gets sound out of your mac) - $79.99 + plus shipping - google it.
Software -
Parallels software - $75.00 - Use it to run Wondows and OS X at the same time. You can also get an alternative which is called VMware. Some people have tried using it but can't get Iguidance to work because of some deal they have with Parallels software.

iGuidance 4 GPS Navigation Software + GlobalSat BU-353(SiRF III)- GPS Navigation System for Laptop $130.00 shipped BuyGPsnow.com - Bundled GPS receiver and Iguidance software. This (iguidance) to me was the best bang for the buck. Has the best car interface because it was designed to be put in a car computer.
AMP software - free - mac front end software. A front end is a user interface which lets you access whatever you want from a convenient screen instead of using the small layout of a regular computer. The buttons are oversized and fonts are oversized to accomodate the in-car experience.
Road Runner software - free - Windows front end software. This free front end has hundreds of free skins and hundreds of people working together for free making it one of the best front ends out there.
Once you make the screen, you can start installing everything.
Honda EP3 / DC5 Car Stereo Radio Wiring Diagram Car Radio Constant 12v+ Wire: Blue/White
Car Radio Switched 12v+ Wire: Yellow/Red
Car Radio Ground Wire: Black
Car Radio Illumination Wire: Red/Black
Car Stereo Dimmer Wire: Red
Car Stereo Antenna Trigger: N/A
Car Stereo Amp Trigger Wire: N/A
Car Stereo Amplifier Location: N/A
Front Speakers Size: N/A
Front Speakers Location: N/A
Left Front Speaker Positive Wire (+): Blue/Green
Left Front Speaker Negative Wire (-): Gray/Black
Right Front Speaker Positive Wire (+): Red/Green
Right Front Speaker Negative Wire (-): Brown/Black
Rear Speakers Size: N/A
Rear Speakers Location: N/A
Left Rear Speaker Positive Wire (+): Blue/Yellow
Left Rear Speaker Negative Wire (-): Gray/White
Right Rear Speaker Positive Wire (+): Red/Yellow
Right Rear Speaker Negative Wire (-): Brown/White
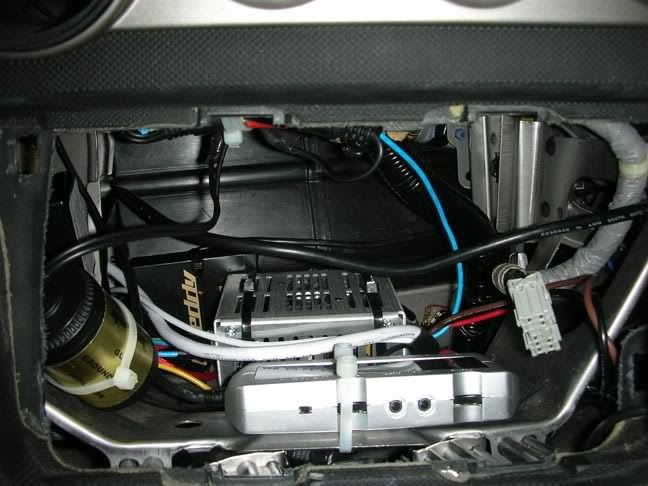
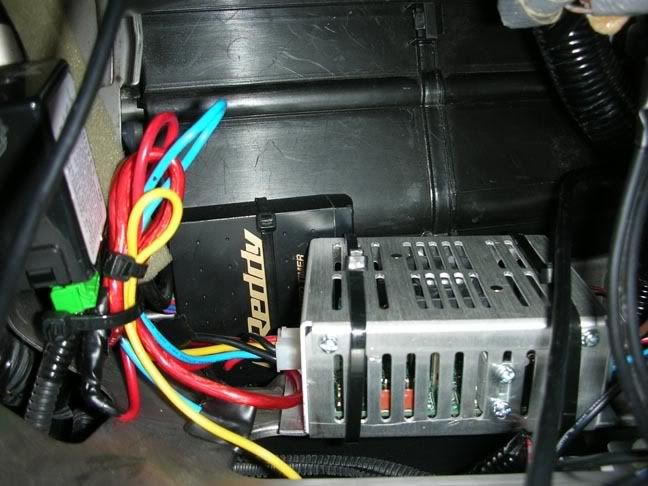
up front you can see where i zip tied the Edirol soundcard. behind that is where the P1900 powersupply is zip tied.
If you look closely behind and to the right of the power supply, you can see where I grounded the P1900 along with the other wires.
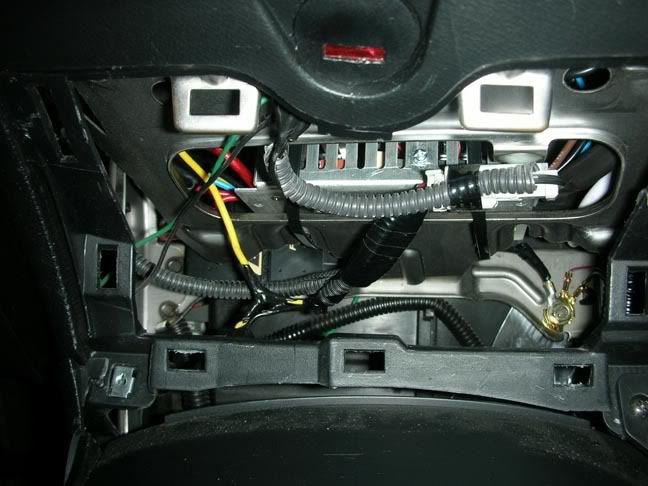
You can also see where the gournd loop isolator sits next to the external soundcard. it goes from external soundcar>>>>groundloop isolator>>>metra wire harness.
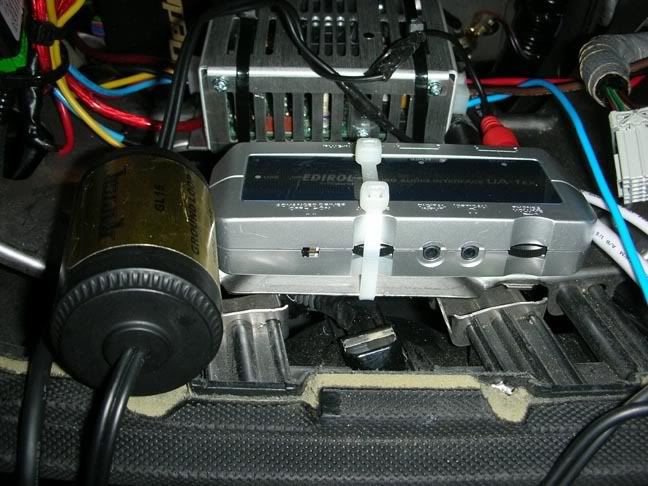
When I bought the ground loop isolator, the RCA outputs and inputs were reversed so i had to dyke them off and resolder them...

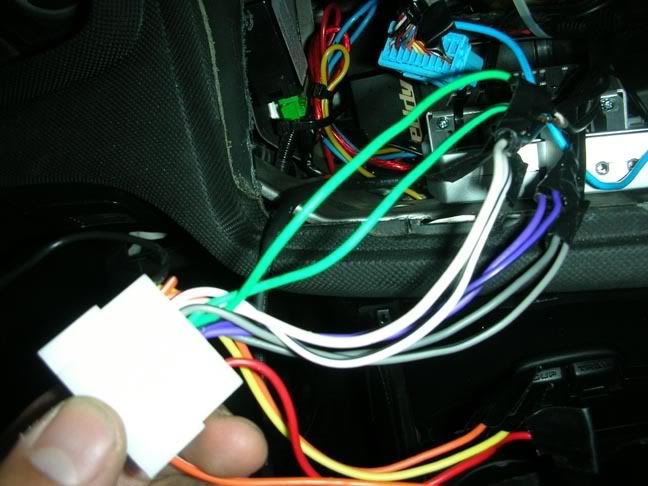
ok, so the metra harness should be labeled. (RT front +, RT front -, LT front +, LT front -, etc....) i combined the lefts and the rights together to turn them into 2 RCA outputs. So at this point you can either feed your output from your soundcard (actualy the ground loop isolator) to your amps if you have them or directly into this metra harness if you're running the stock amps like me. i plan on upgrading to amps somtime in the future....
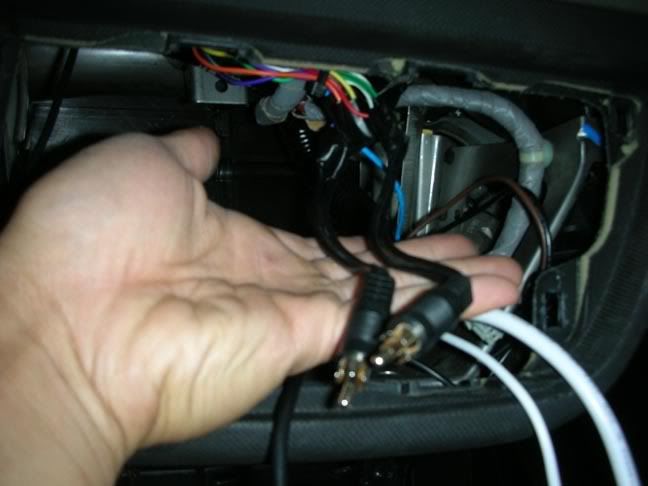
Here is where i soldered the RCA cables.
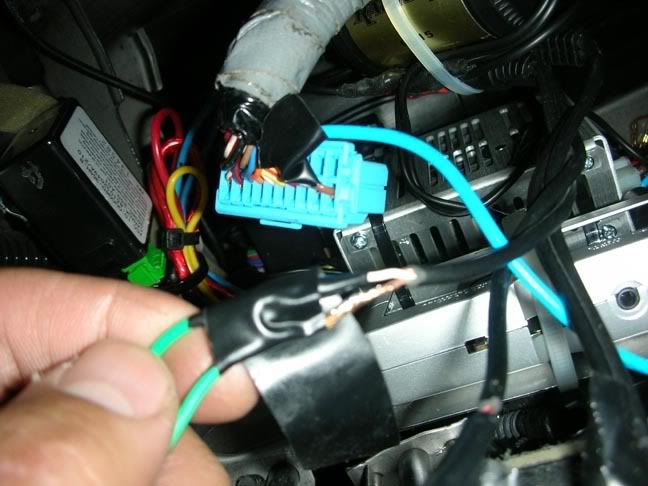
Here's where you'll be splicing into the 12v ACC wire.
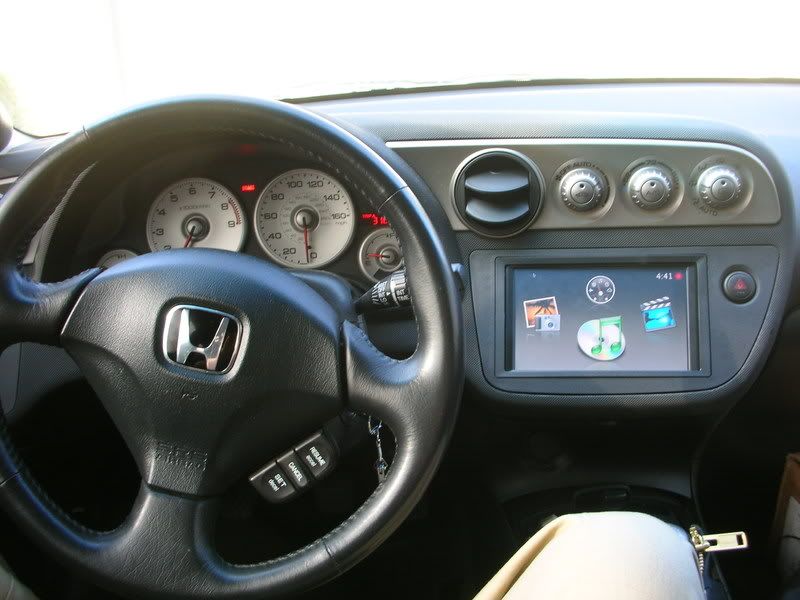

Gauges on the screen are from the Kpro
This DIY is for the lazy people out there (like me) who wished something out there like this was available instead of having to search through hundreds of threads to make decent sense of building a car computer. Use this as a rough guide. I'll try to include as much of the install as much as I can. I'm also using the stock amps so for all you audio gurus out there, feel free to add amps. here's the breakdown of the parts that I used and rough prices. Remember these are my opinions!
I will be updating this everyday until I finish the write-up. there's a lot of info...
The prices here are what i ended up spending +/- $100.00
Wiring diagram is belooowwwww
Mac Mini - You can probably get a decent Intel core duo/solo one for about $350-$500. Get the Intel chip so you can run both windows and OS X. I also upgraded my RAM to 2gigs instead of 512MB. Add another $100.00
7" monitor - Xenarc 700TSV - touchscreen monitor. 379.00 + 20 shipping
American Interntional bezel from ebay - dont pay more than $20.00 shipping included on ebay search! you gotta look at the bezel. If it's an americal international, youll see a frame around the double din. You can probably use another double din, but the AI looks better with the frame IMHO.
glue sticks, glue gun, epoxy - $20.00 at lowes or Ace Hardware.
Carnetix P1900 (CNX-P1900 Ver. 2.2 Dual Output 140 Watt 12V DC-DC Regulator) (you need this to power up your Mac and to shut it down instead of pressing the button. In other words, you let the car turn on/turn off instead of you having to press the button. more info later)- $99.95 shipped from mp3car.com. Another alternative (possibly better but more expensive) is the P2140 power supply. This power supply allows you visually see what the power supply is "pulling" from the car and "putting out" to your screen and Mac mini.
Carnetix Macpac cable harness (connects your power supply to your car to your car's power supply) This thing is awesome. Allows you to not have to cut you power supply which came with your mac mini. So if you want to remove the computer from your car, you can because you'll still have your original in your house. - $24.99 shipped
Ground loop isolator- (to eliminate engine noise quickly when you think you grounded everything correctly. worked for me!) - $8.00 shipped through ebay. When I thought i had grounded everything correctly, I still had alternator whine and computer hard drvie noises. Now installing this got rid of all that.
Metra wire harness - $21.00 - use it so you don't have to cut into your factory harness to hook up your stock amp and stock speakers. It's also a good idea to have because if you dont use it, soldering in that little double din hole becomes annoying.- Clubrsx.com
RCA cables - 4 bucks shipped through ebay. You should probably get some gold ones though, i used cheapo ones..
zip ties - $10.00 at walmart.
Edirol/Roland UA-1EX sound card interface box (gets sound out of your mac) - $79.99 + plus shipping - google it.
Software -
Parallels software - $75.00 - Use it to run Wondows and OS X at the same time. You can also get an alternative which is called VMware. Some people have tried using it but can't get Iguidance to work because of some deal they have with Parallels software.
iGuidance 4 GPS Navigation Software + GlobalSat BU-353(SiRF III)- GPS Navigation System for Laptop $130.00 shipped BuyGPsnow.com - Bundled GPS receiver and Iguidance software. This (iguidance) to me was the best bang for the buck. Has the best car interface because it was designed to be put in a car computer.
AMP software - free - mac front end software. A front end is a user interface which lets you access whatever you want from a convenient screen instead of using the small layout of a regular computer. The buttons are oversized and fonts are oversized to accomodate the in-car experience.
Road Runner software - free - Windows front end software. This free front end has hundreds of free skins and hundreds of people working together for free making it one of the best front ends out there.
Once you make the screen, you can start installing everything.
Honda EP3 / DC5 Car Stereo Radio Wiring Diagram Car Radio Constant 12v+ Wire: Blue/White
Car Radio Switched 12v+ Wire: Yellow/Red
Car Radio Ground Wire: Black
Car Radio Illumination Wire: Red/Black
Car Stereo Dimmer Wire: Red
Car Stereo Antenna Trigger: N/A
Car Stereo Amp Trigger Wire: N/A
Car Stereo Amplifier Location: N/A
Front Speakers Size: N/A
Front Speakers Location: N/A
Left Front Speaker Positive Wire (+): Blue/Green
Left Front Speaker Negative Wire (-): Gray/Black
Right Front Speaker Positive Wire (+): Red/Green
Right Front Speaker Negative Wire (-): Brown/Black
Rear Speakers Size: N/A
Rear Speakers Location: N/A
Left Rear Speaker Positive Wire (+): Blue/Yellow
Left Rear Speaker Negative Wire (-): Gray/White
Right Rear Speaker Positive Wire (+): Red/Yellow
Right Rear Speaker Negative Wire (-): Brown/White
up front you can see where i zip tied the Edirol soundcard. behind that is where the P1900 powersupply is zip tied.
If you look closely behind and to the right of the power supply, you can see where I grounded the P1900 along with the other wires.
You can also see where the gournd loop isolator sits next to the external soundcard. it goes from external soundcar>>>>groundloop isolator>>>metra wire harness.
When I bought the ground loop isolator, the RCA outputs and inputs were reversed so i had to dyke them off and resolder them...
ok, so the metra harness should be labeled. (RT front +, RT front -, LT front +, LT front -, etc....) i combined the lefts and the rights together to turn them into 2 RCA outputs. So at this point you can either feed your output from your soundcard (actualy the ground loop isolator) to your amps if you have them or directly into this metra harness if you're running the stock amps like me. i plan on upgrading to amps somtime in the future....
Here is where i soldered the RCA cables.
Here's where you'll be splicing into the 12v ACC wire.
Gauges on the screen are from the Kpro
