• Registered users are encouraged to enable MFA/2FA to add an aditional layer of security to their account. More information can be found here: https://www.ncsc.gov.uk/collection/top-tips-for-staying-secure-online/activate-2-step-verification-on-your-email

EP3 Flashy's CG EP3 premier

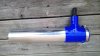
I figured a few things. It's less messy, it's handy if you overfill or need to remove the oil for any other reason. For me to get under the car I really need to use my ramps as I'm not small, I figured that taking the front wheel off while the pump was doing it's thing was a better option. You need to warm the oil up and give the extractor a few extra pumps if it seems to stop working. Other than that it was straightforward. It took around 4.5 litres out of the car and I could feel the bottom of the sump with the pipe.
 
Saves loads of time/effort. You don't need to jack the car up. You shove the pipe down the dip stick tube. You get more oil out using one of these than a jack or ramps at home as invariably you're not flat and level when jacking or using ramps. That means you always have a small pocket of oil left in the sump. Less likely with a pump on flat and level ground.

I don't know about FN2s nut you can certainly get to the oil filter from the top on an EP3. I set the pump going, then attack the oil filter. By the time I've done that (might need an extra pump or two mid-extraction) it's usually finished and ready for new oil.
 
Lovely

13ed1u.jpg
 
Just bought an Apexi power intake kit including heatshield, already got a caf installed from the fog light :p
 
Changed the front pads today, put some stoptechs in. Cleaned the slider pins and regreased, one was stuck pretty solid. Used some ceratec to grease the pad shoulders, and stuck some fresh clips in. Happy.
Got some Brembo pads for the rears, might stick them in on Monday.
 

Attachments

  • DSC_1816-2393x1350.JPG
    DSC_1816-2393x1350.JPG
    825 KB · Views: 19
  • DSC_1818-2992x1688.JPG
    DSC_1818-2992x1688.JPG
    522.5 KB · Views: 22
  • DSC_1819-2393x1350.JPG
    DSC_1819-2393x1350.JPG
    530.6 KB · Views: 22
How you rating them so far, I drove mine quite hard to the meet this morning and I'd say they did very good for how much they cost. Almost no fade, and literally no brake dust after such a run.
 
Stuck the Brembo pads on the rears today, braking grip is much stronger now. Will put fresh fluid in, probably ate or similar.
 
Got a Js racing c pillar brace arriving soon, in the meantime I managed to get some rear pillar trims secondhand so I can drill a hole to pass the brace through.
 
Luckily it all arrived together, just in time for the weekend :)
 

Attachments

  • DSC_0013-2393x1350.JPG
    DSC_0013-2393x1350.JPG
    922.6 KB · Views: 33
Job done. :p
 

Attachments

  • DSC_0026-2393x1350.JPG
    DSC_0026-2393x1350.JPG
    572.7 KB · Views: 39
  • DSC_0024-2992x1688.JPG
    DSC_0024-2992x1688.JPG
    934.1 KB · Views: 39
  • DSC_0013-2393x1350.JPG
    DSC_0013-2393x1350.JPG
    922.6 KB · Views: 30
Ordered some stuff to build my induction kit. I have a Hybrid Racing velocity stack and filter coming, looking forward to getting that fitted. Velocity stack reducer from 6" to 3" with a 7.5" wide filter. :D
 
Catch can is here. Thinking of installing next to washer bottle.
 

Attachments

  • sketch-1536657068102-1084x612.png
    sketch-1536657068102-1084x612.png
    937.4 KB · Views: 47
The first part arrives for my velocity stack build :D
 

Attachments

  • DSC_0030-2992x1688.JPG
    DSC_0030-2992x1688.JPG
    637.1 KB · Views: 18
The homemade velocity stack 3" intake progresses. Just need the velocity stack and filter to arrive :p
 

Attachments

  • DSC_0054-2393x1350.JPG
    DSC_0054-2393x1350.JPG
    559.8 KB · Views: 36
The velocity stack will be here next week. After fitment I'm going to design and build an aluminium "cold" box to house the stack. I already have a cold air feed from the fogs.
 
Back
Top